:max_bytes(150000):strip_icc()/spruce-crafts-header-illo-1fcc1cb416554246b2063d9fe26fb24f.png)
How to Sew a Stuffed Pumpkin
:max_bytes(150000):strip_icc()/StuffedPumpkin1-59dbc9f103f40200104a6e86.jpg)
This free pillow pattern, available in two sizes, creates a stuffed pumpkin to use as decoration for Halloween and Thanksgiving. These pumpkin pillows look great paired with other autumn pillows on a sofa or overstuffed chair, and they work as part of a table centerpiece. They're even fun for kids to have a soft pumpkin to hug or snuggle with. Create an entire pumpkin patch by using various orange prints!
Being familiar with soft sculpture techniques will help you create these pumpkins but they are also a great way to experience how soft sculpture transforms a stuffed item. As you can see, there will be some variations in sizes and shapes due to how the pumpkin is stuffed or pieced.
What You'll Need
Equipment / Tools
- Scissors
- Pins
- Needle
- Printer
Materials
- 1/2 yard orange fabric (calico or plain orange)
- Orange thread
- Poly-fill or stuffing
- Orange embroidery thread or Perle cotton
- Button and carpet thread
- Printer paper
Instructions
-
Download and Print the Pattern
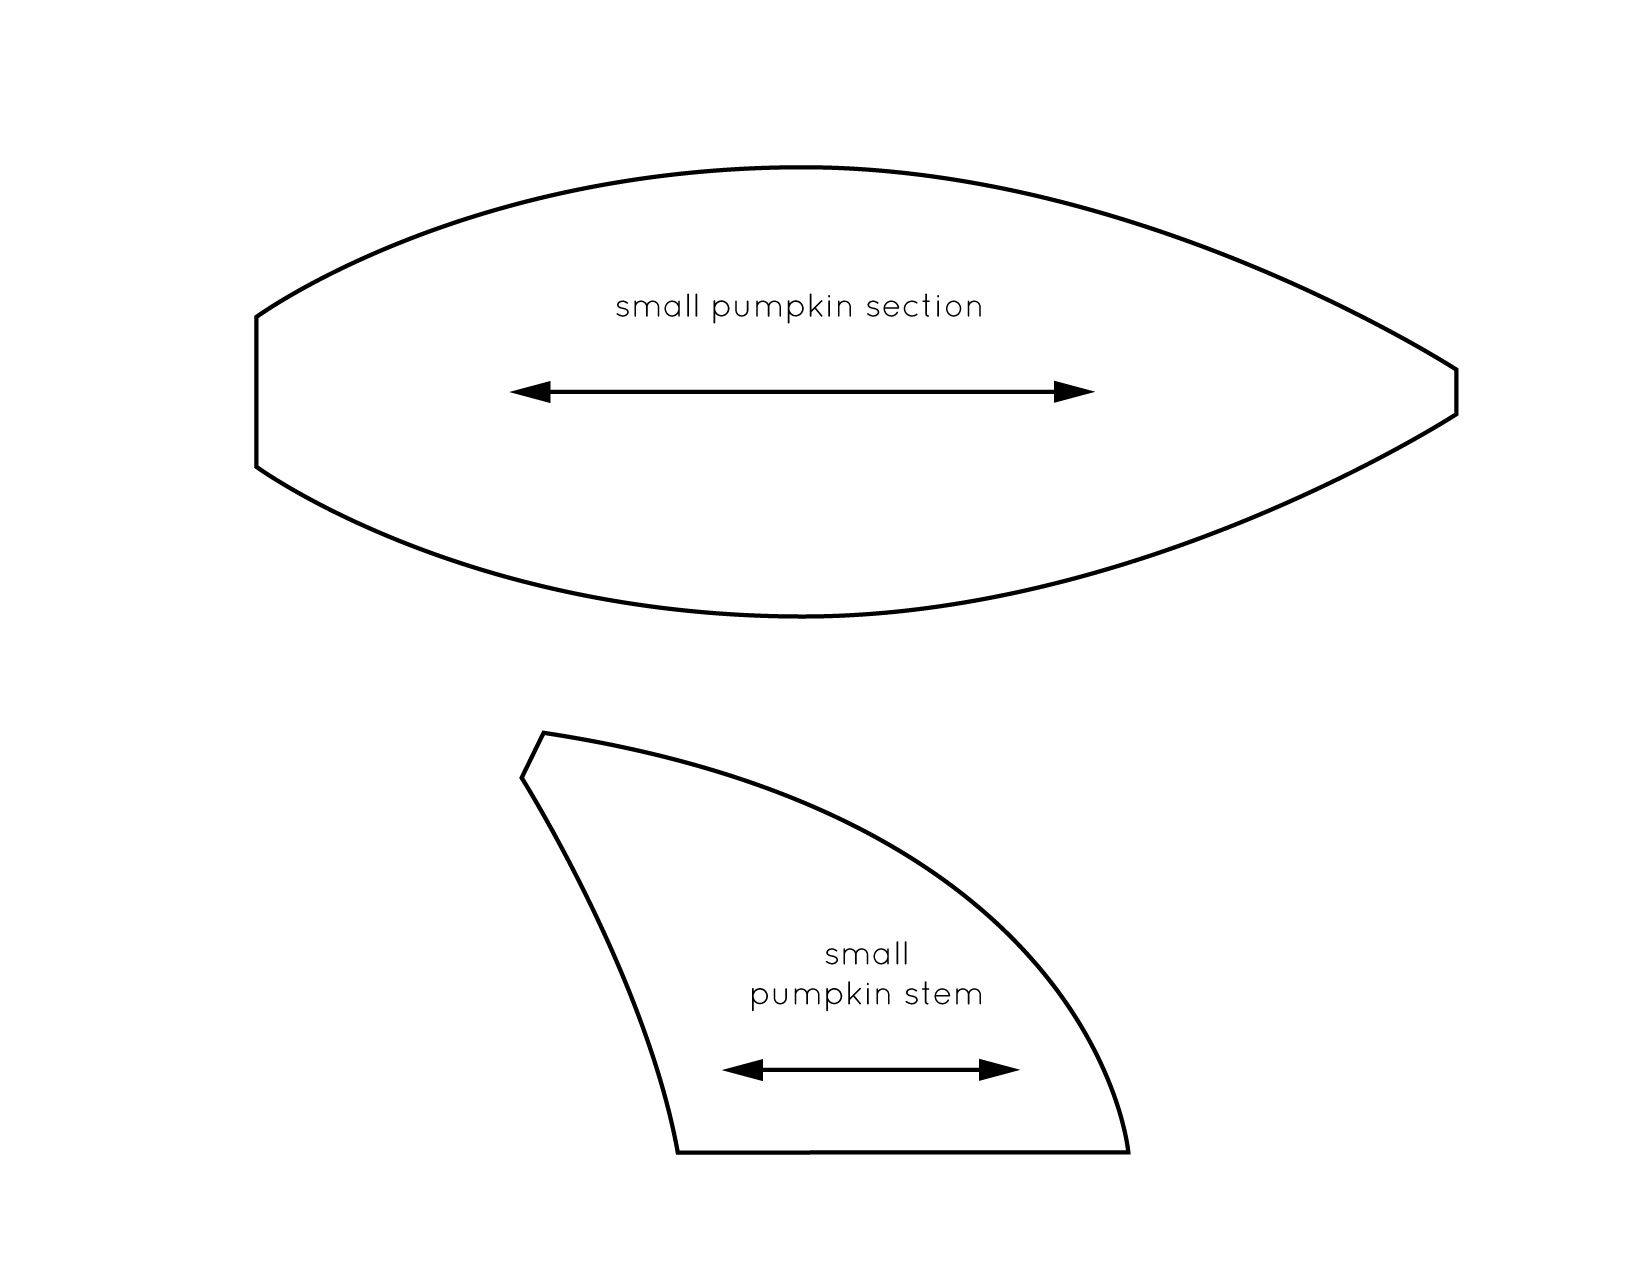
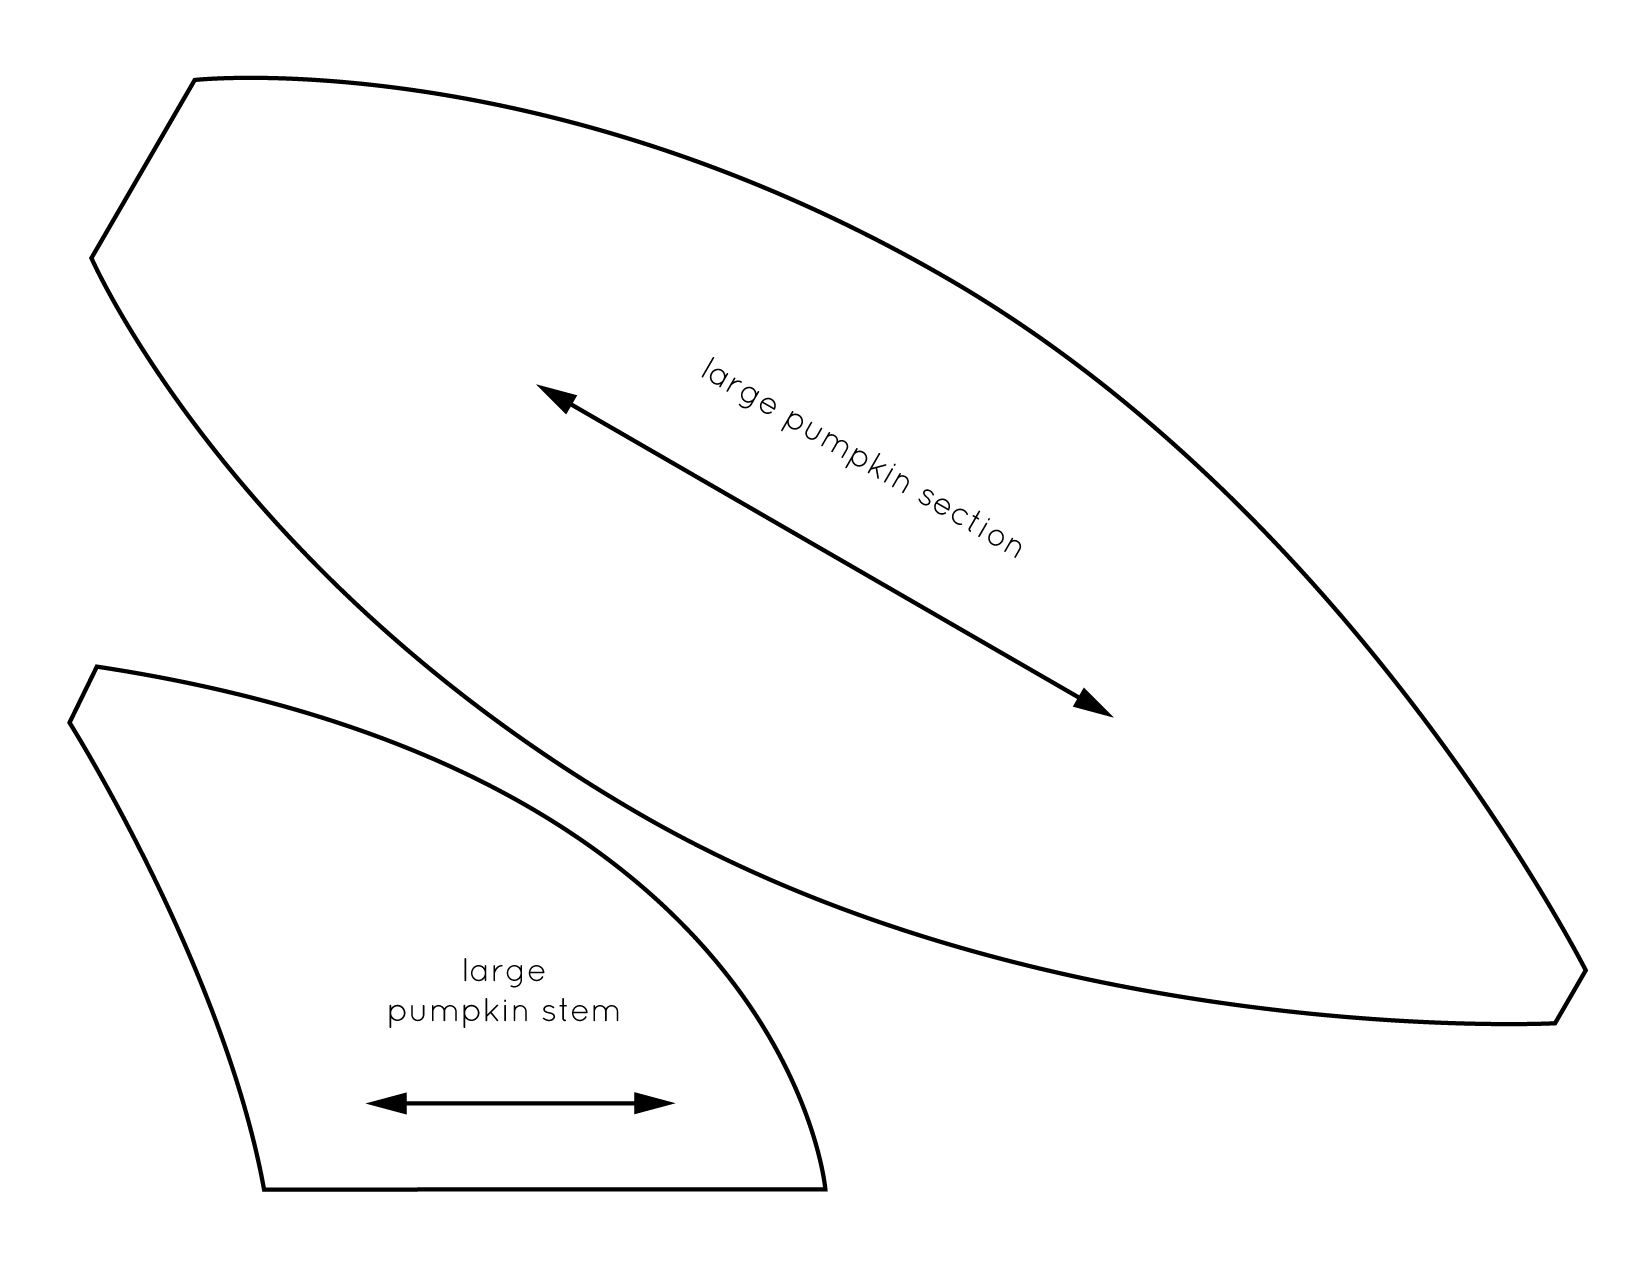
Download the small pumpkin pattern or the large pumpkin pattern. Print the JPG pattern pages at full-page size. The small pumpkin section should measure about 8 inches long, and the large pumpkin section should measure about 11 inches long; however, the sizes don't need to be precise.
-
Cut Pumpkin Pattern Pieces
Cut eight sections of the pumpkin body piece. These may be cut on the lengthwise or crosswise grain of the fabric. They must be cut on a straight grain to avoid the pumpkin twisting. Cut two pieces of the stem.
![Cut the Pumpkin Pieces]()
Mollie Johanson -
Assemble the Pumpkin
Begin by joining two pumpkin sections, wrong sides together, on one edge. Be sure to back stitch at the ends. The seams will come apart when you are stuffing it if you do not back stitch. Open the joined section and join another pumpkin body section to one side.
Repeat the above step until all sections are joined together. Join the two ends together to form a ball. One end of the ball will be closed and the other will have an opening for you to stuff through. Check that the bottom of the pumpkin is sewn closed completely.
![Sew the Pumpkin Sections Together]()
Mollie Johanson -
Stuff the Pumpkin
Turn the fabric to the right sides out, and stuff the pumpkin. It should be semi-firm, with some give but still firm to a light touch. To obtain a smooth exterior on the pumpkin, add the stuffing in small pieces, starting at the center and working the stuffing out to the sides.
![Fill the Pumpkin With Stuffing]()
Mollie Johanson -
Close the Opening
Thread a needle with strong thread. Leave a 6-inch tail on the thread by knotting (large knot) the thread at least 6 inches from the end. Make a running stitch around the top opening.
Pull the thread to gather the opening closed. Tack the threads to tie it off and use the long tail to knot and anchor your stitches as you close it. This will be hidden under the stem, so neatness is not imperative; however, you do want to draw it tight so you can hide the stitches under the stem.
![Tie the Opening Closed]()
Mollie Johanson -
Shape and Sculpt the Pumpkin
Roll the ball on the floor or with your hands to smooth out the ball and obtain the basic shape that you want for a pumpkin. Try to roll out as many hollows as possible.
Thread a large-eyed needle with six strands of embroidery thread or Perle cotton. Tie off the embroidery thread where you pulled tight gathered the top closed. A tail on the thread is also helpful here.
Wrap the embroidery thread around the seam lines on your pumpkin. Pull the thread tight, so that the seams indent and tie off after pulling over each seam. Tie off and cut the remaining tails of thread.
![Wrap the Seams to Sculpt the Pumpkin]()
Mollie Johanson -
Attach the Stem
Sew the two stem pieces together and turn right side out. Be sure to get the top point turned all the way out. Stuff to a semi-firm stage.
Use straight pins to hold the stem in place on the top of the pumpkin, making sure that all of the stitches on the pumpkin are covered. Use a slip stitch to attach the stem.
![Sew the Stem to the Pumpkin]()
Mollie Johanson -
Add a Pumpkin Face (Optional)
Cut felt shapes, such as triangles, circles, and a mouth, to create a jack-o-lantern face. Spray the back of the felt with temporary basting spray and press in place on the pumpkin. Using the temporary spray allows you to also use the pumpkins for Thanksgiving decorations. For a more permanent face, use fusible web or a slip stitch to attach the face pieces.
To make a small and cute embroidered face like shown above, stitch the eyes with French knots and the mouth with fly stitch. You should do this on one of the panels before sewing them all together.
![Pumpkin Pillow With Optional Changes]()
Mollie Johanson -
Add Vines and Leaves (Optional)
Cut out a few felt leaves to attach near the stem. You can also add pipe cleaners to make curly vines. Use a small amount of hot glue to anchor the leaves.
:max_bytes(150000):strip_icc()/StuffedPumpkin3-59dbc9e3d088c0001020ab73.jpg)
:max_bytes(150000):strip_icc()/StuffedPumpkin4-59dbc9b3519de20011bffb21.jpg)
:max_bytes(150000):strip_icc()/StuffedPumpkin5-59dbc99e845b340012055809.jpg)
:max_bytes(150000):strip_icc()/StuffedPumpkin6-59dbc9f06f53ba0010a17583.jpg)
:max_bytes(150000):strip_icc()/StuffedPumpkin7-59dbc985aad52b0010cbf910.jpg)
:max_bytes(150000):strip_icc()/StuffedPumpkin8-59dbc9d922fa3a0011797ad2.jpg)
:max_bytes(150000):strip_icc()/StuffedPumpkin10-59dbc8bd22fa3a0011791e7a.jpg)
:max_bytes(150000):strip_icc()/final2-9bac6a0b4f7b4a2f929624122b8a964f.jpg)
:max_bytes(150000):strip_icc()/slipstitch-5c742f5fc9e77c0001be522d.jpg)
:max_bytes(150000):strip_icc()/halloween-pumpkin-lantern-in-front-of-a-white-brick-wall-1174885259-9f6db00eec6e4044b0fe654858d5cdc7.jpg)
:max_bytes(150000):strip_icc()/How-to-Crochet-a-Pumpkin-13-a7ece4ce2180440c8019327b6a6df72c.jpg)
:max_bytes(150000):strip_icc()/creative-pumpkin-carving-ideas-4152994-v1-c075ef16248249c8bf38b7a128767963.png)
:max_bytes(150000):strip_icc()/ToothFairyPillow1-5a872ca1c673350037be4c2e.jpg)
:max_bytes(150000):strip_icc()/KnottedChainFriendshipBracelet10-485d5294a42b4ad2987f3e672d188096.jpg)
:max_bytes(150000):strip_icc()/CrochetBall8-396e49af71164a6d94c115d6173a5da0.jpg)
:max_bytes(150000):strip_icc()/DogBoneToy1-5a9b16ad0e23d90037550882.jpg)
:max_bytes(150000):strip_icc()/CrochetSnowmanHero-c5985824eb784d07b15243c222c75c05.jpg)
:max_bytes(150000):strip_icc()/BookCoverWithZipperPocket13-f067f232a3be44aba07871c47731e770.jpg)
:max_bytes(150000):strip_icc()/CrochetOctopus1-80e3fa19b0b64302ae28b2ccaaba92bf.jpg)
:max_bytes(150000):strip_icc()/Pumpkins_RedHeart-5b7f0e7346e0fb0050c430df.jpg)
:max_bytes(150000):strip_icc()/CatnipMouseCatToy1-5ab2c31c119fa80037eef032.jpg)
:max_bytes(150000):strip_icc()/Pattern-Gather-59a83f2d6f53ba001105e96e.jpg)
:max_bytes(150000):strip_icc()/halloweenscarecrow-GettyImages-647183263-5919eed95f9b58f4c0851e17.jpg)