:max_bytes(150000):strip_icc()/spruce-crafts-header-illo-1fcc1cb416554246b2063d9fe26fb24f.png)
How to Sew a Reversible Patchwork Stand Mixer Cover
:max_bytes(150000):strip_icc()/MollieJohanson-fc7e70e224544781b74708d692e21d00.jpg)
:max_bytes(150000):strip_icc()/StandMixerCover1-5a6ccfb7ae9ab800374056cc.jpg)
The Spruce / Mollie Johanson
Keep your stand mixer clean and looking beautiful with this free sewing pattern and tutorial for a stand mixer cover. Not only will this cover keep the dust off your mixer, but it also will add some cute and colorful patchwork to your kitchen. You can sew this stand mixer cover with your favorite fabrics and appliqué a row of adorable hearts as well. If you want, you can change out the hearts for another shape or add some embroidery instead. This project is ideal for intermediate sewers and will take a few hours to complete. After you make one for yourself, sew a stand mixer cover for a functional and beautiful personalized gift.
:max_bytes(150000):strip_icc()/StandMixerCover2-5a6ccfb7ff1b780037708a6e.jpg)
What You'll Need
Equipment / Tools
- Pencil
- Scissors
- Iron and ironing board
- Rotary cutter
- Cutting ruler
- Cutting mat
- Pins
- Sewing machine
Materials
- 1 yard main fabric of choice
- 1/2 yard accent fabric of choice
- 1/8 yard various fabrics for patchwork
- 1/8 yard paper-backed fusible web
- 2 1/2 yard midweight fusible interfacing
- Matching thread
Instructions
-
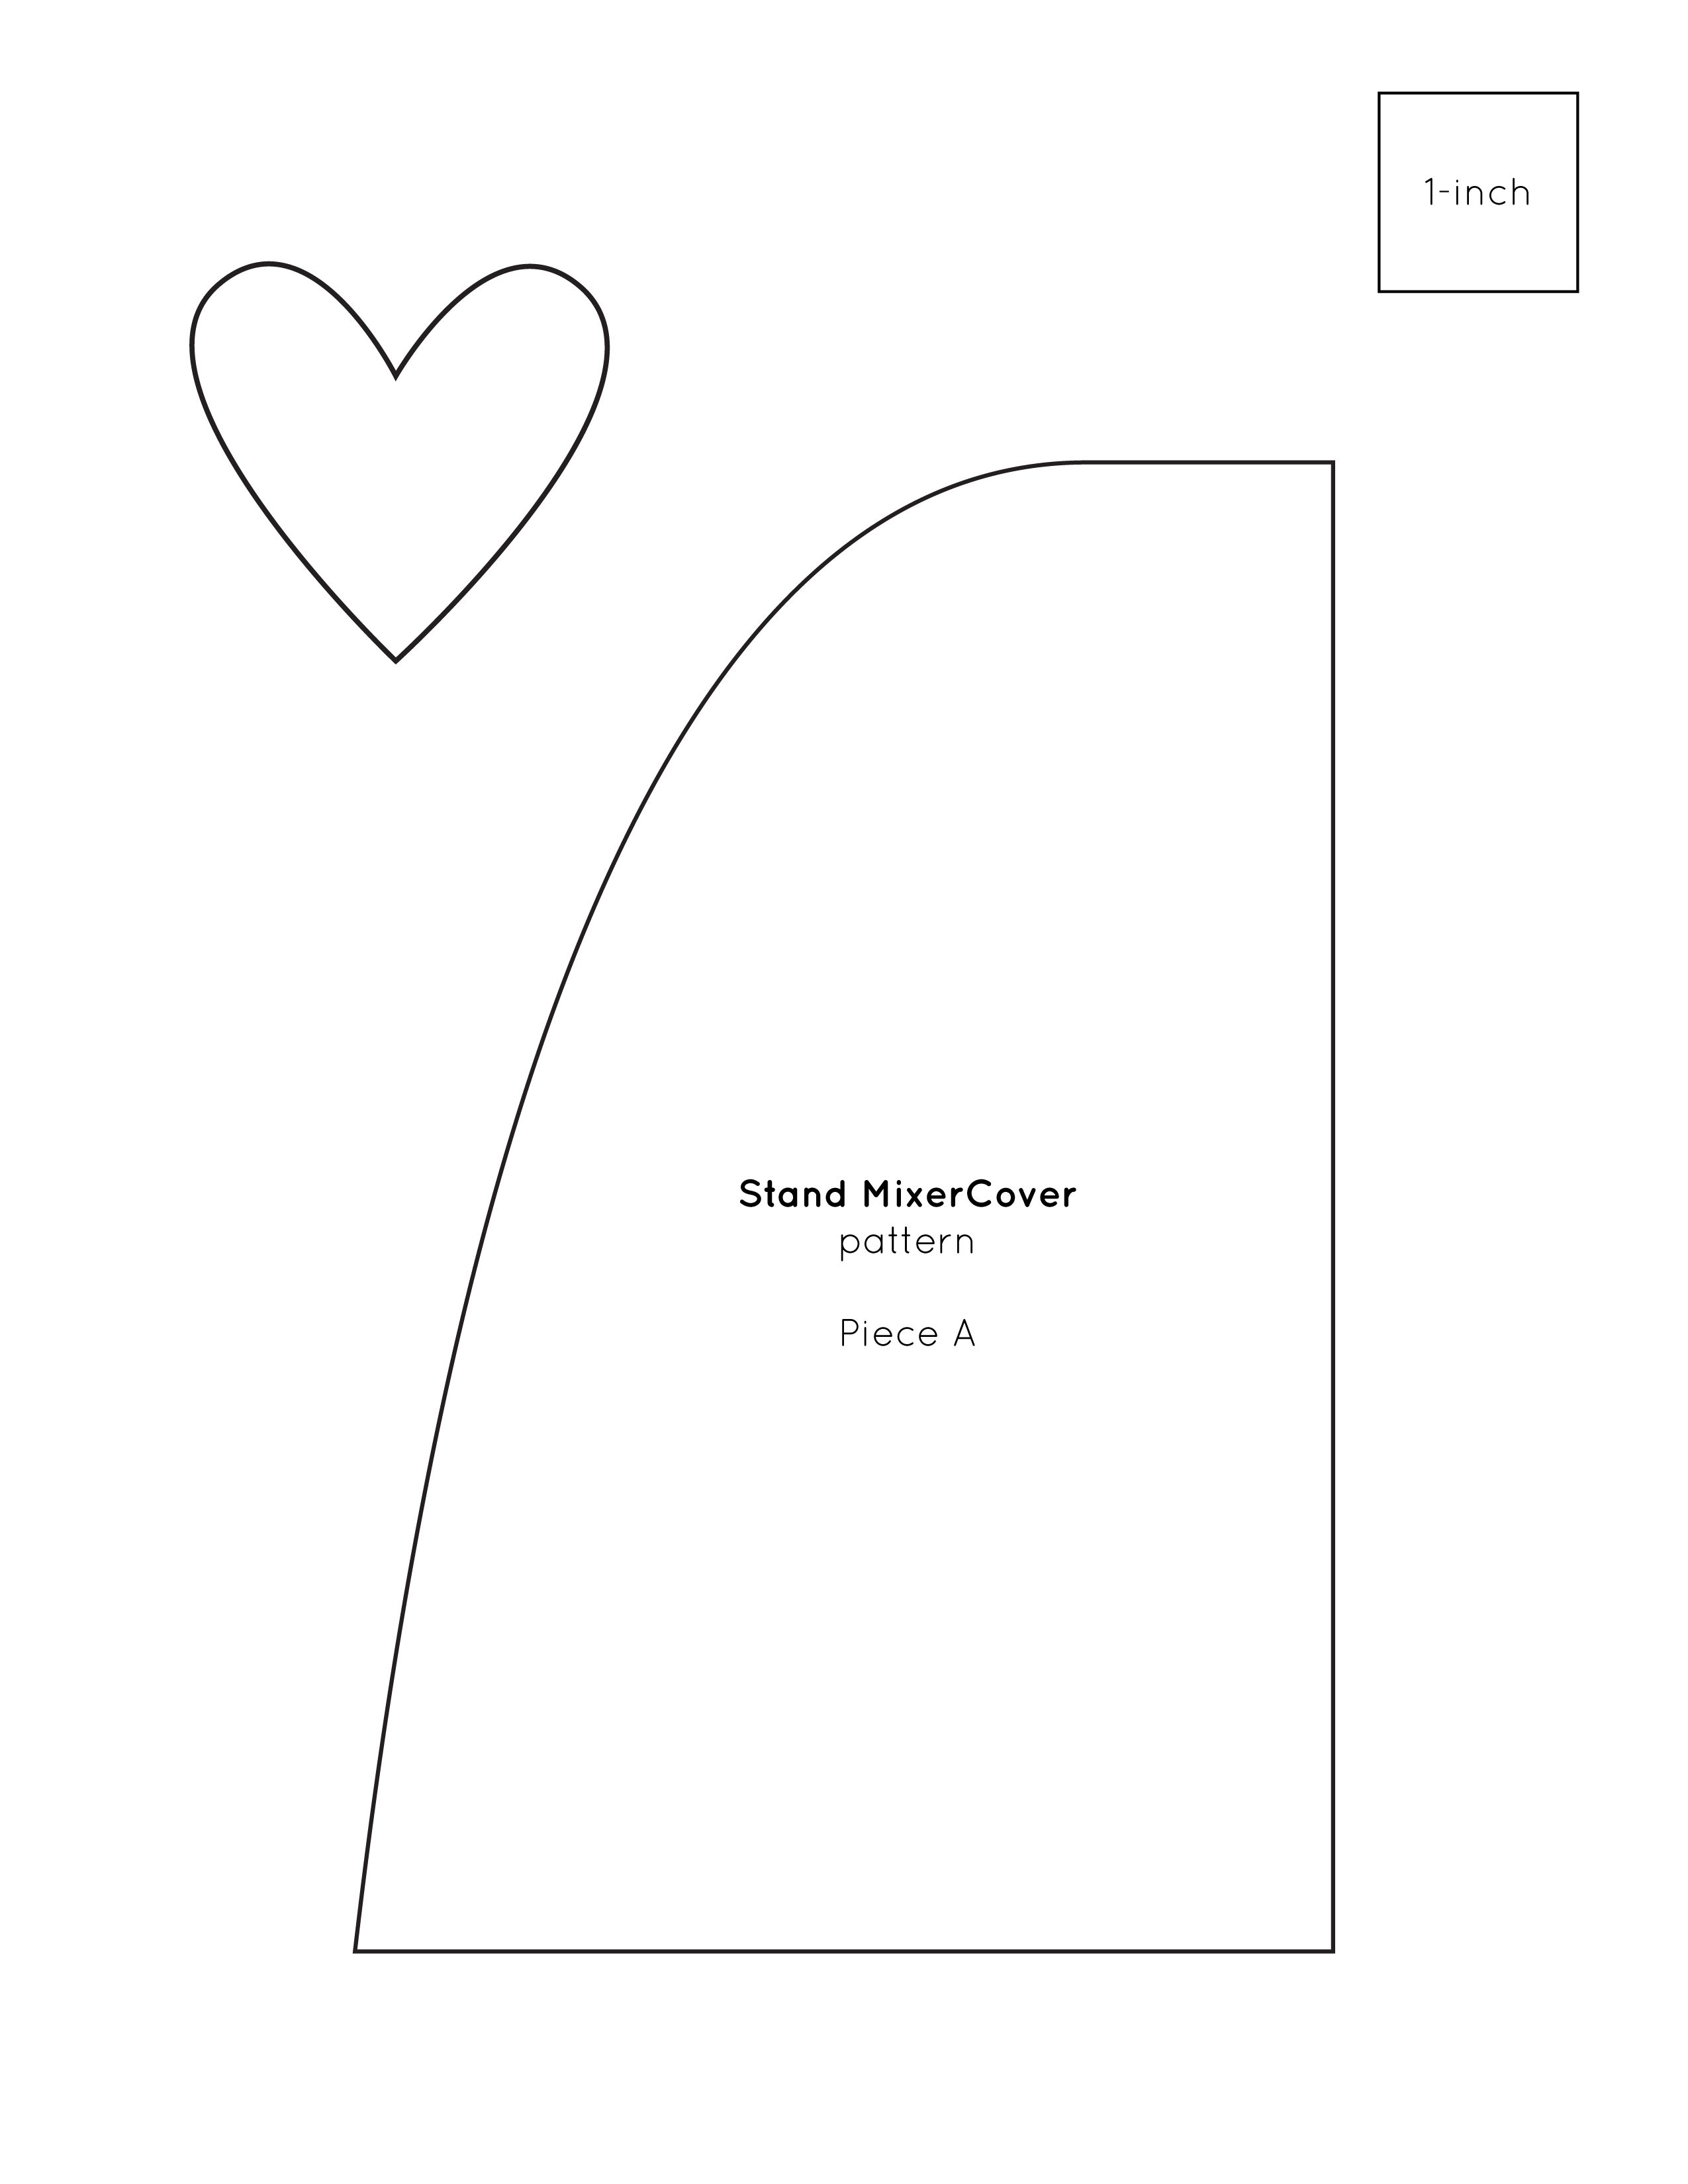
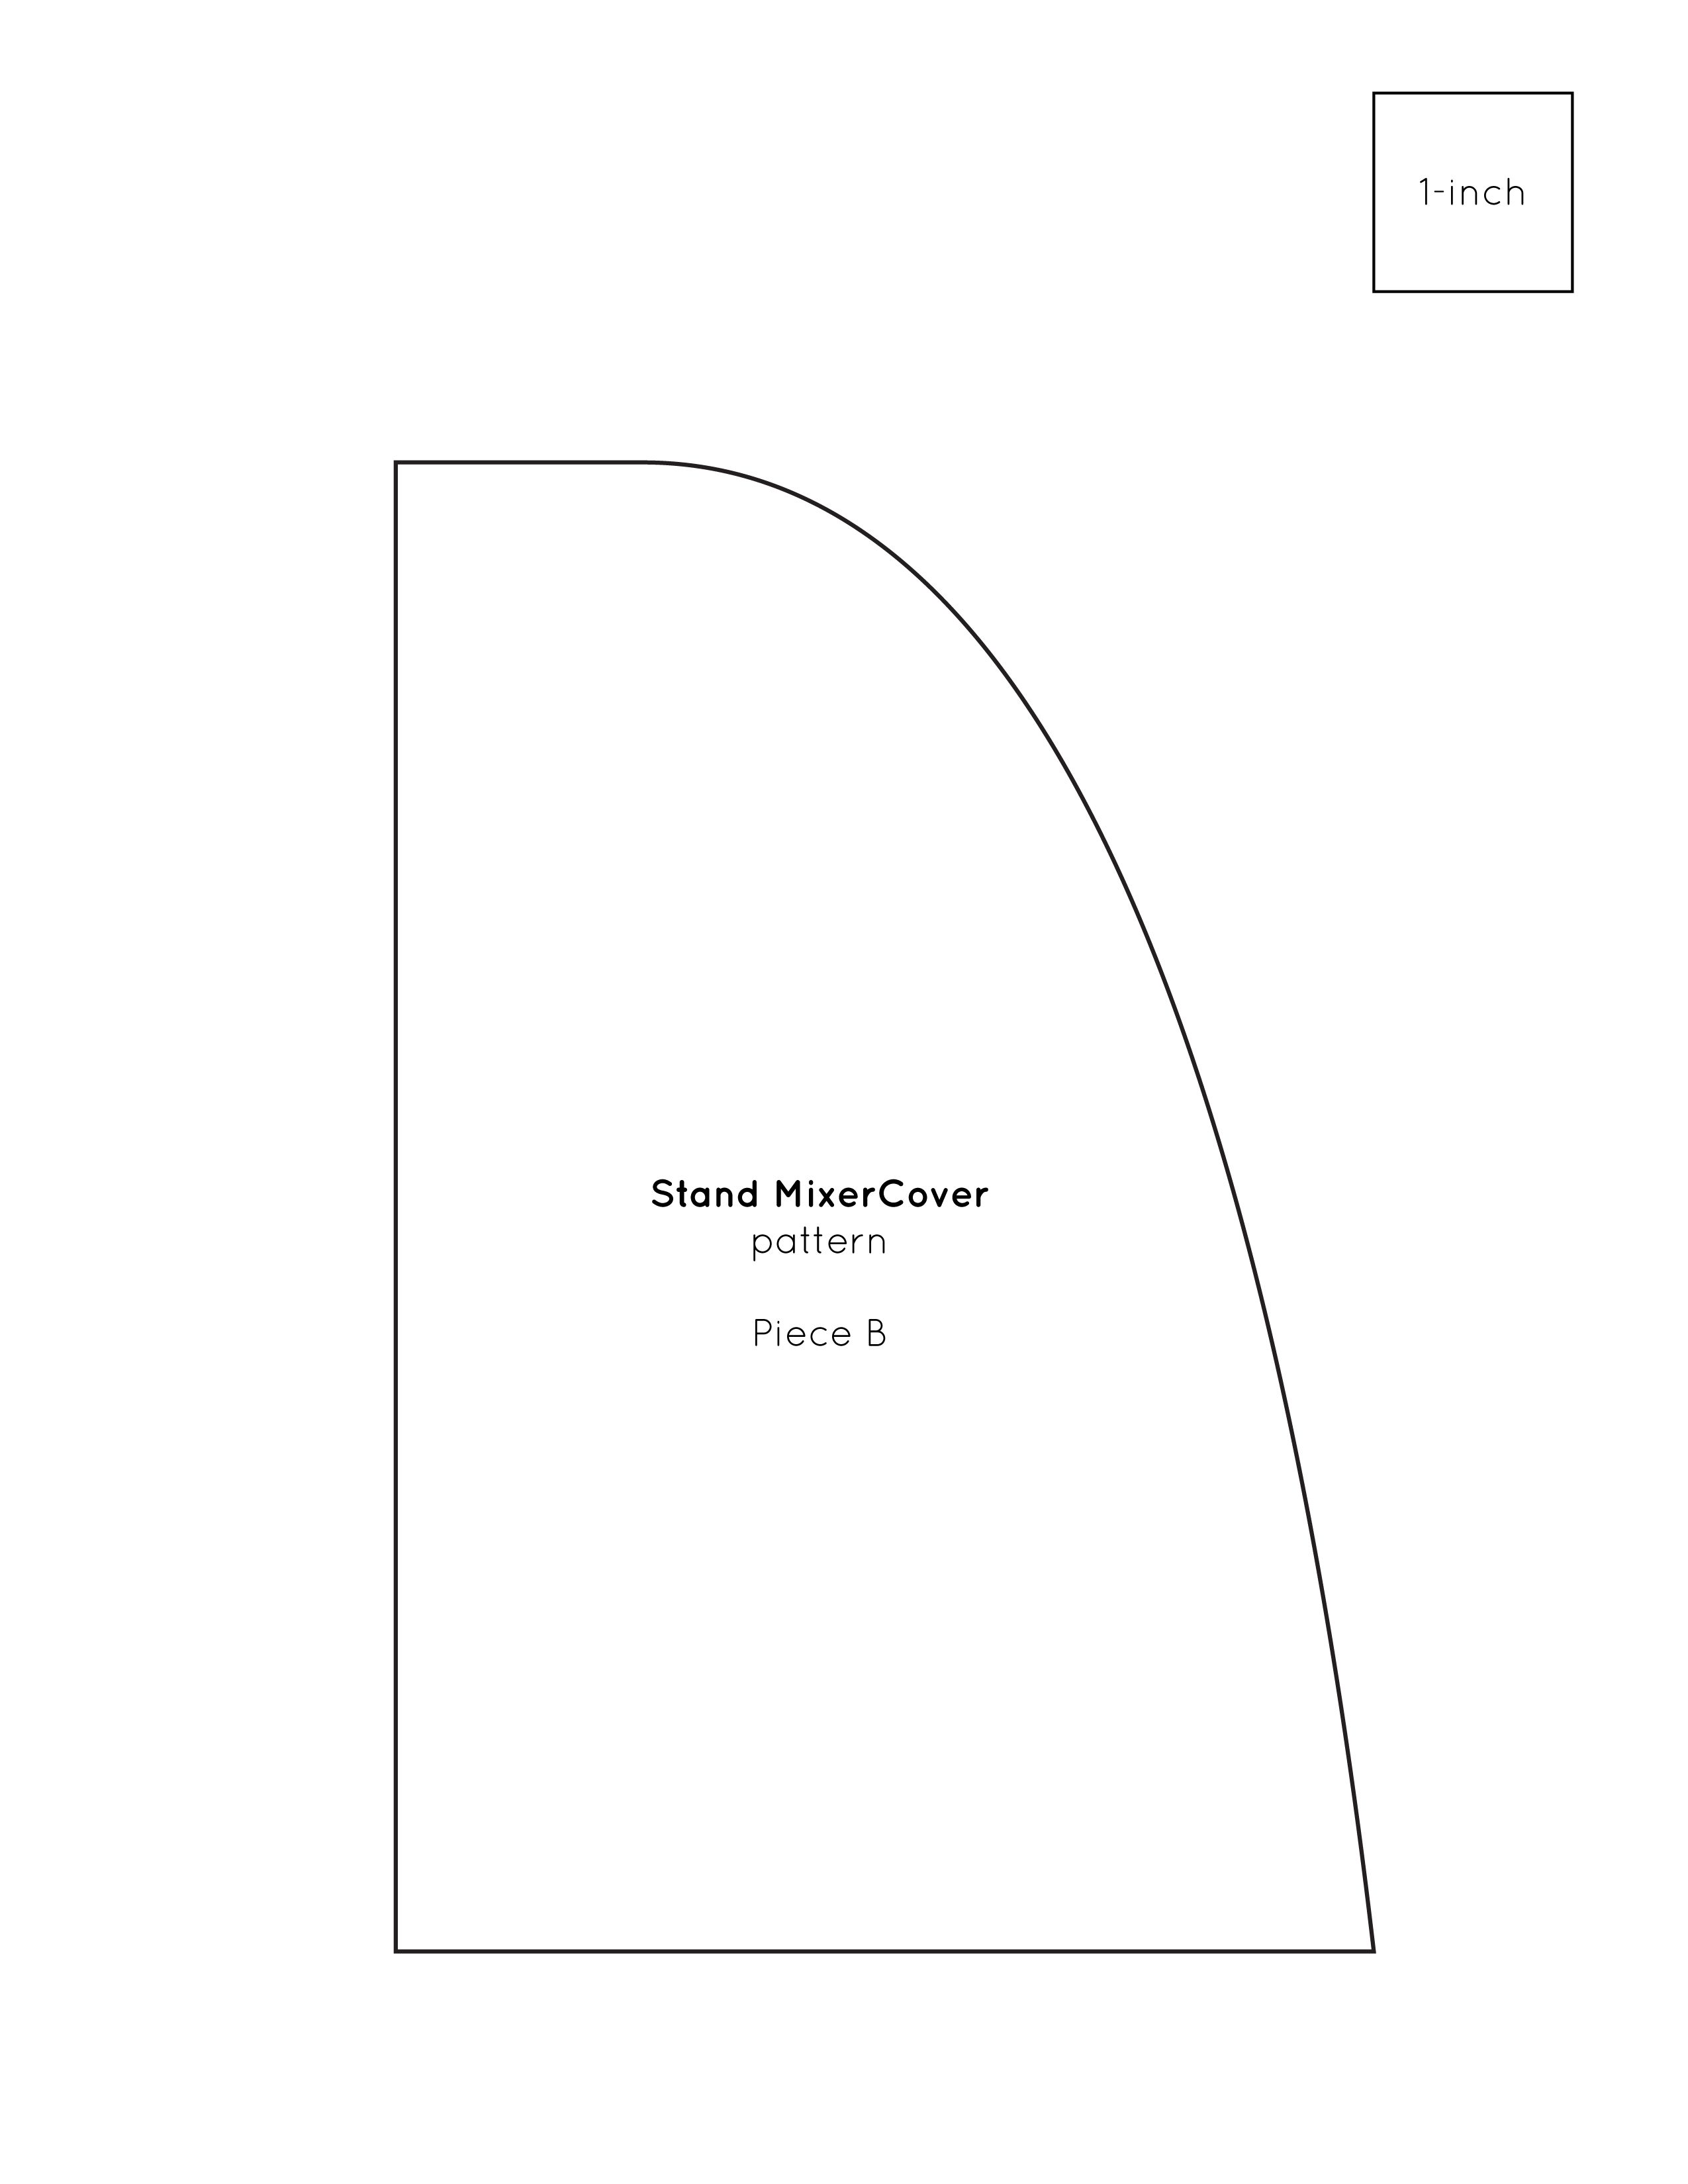
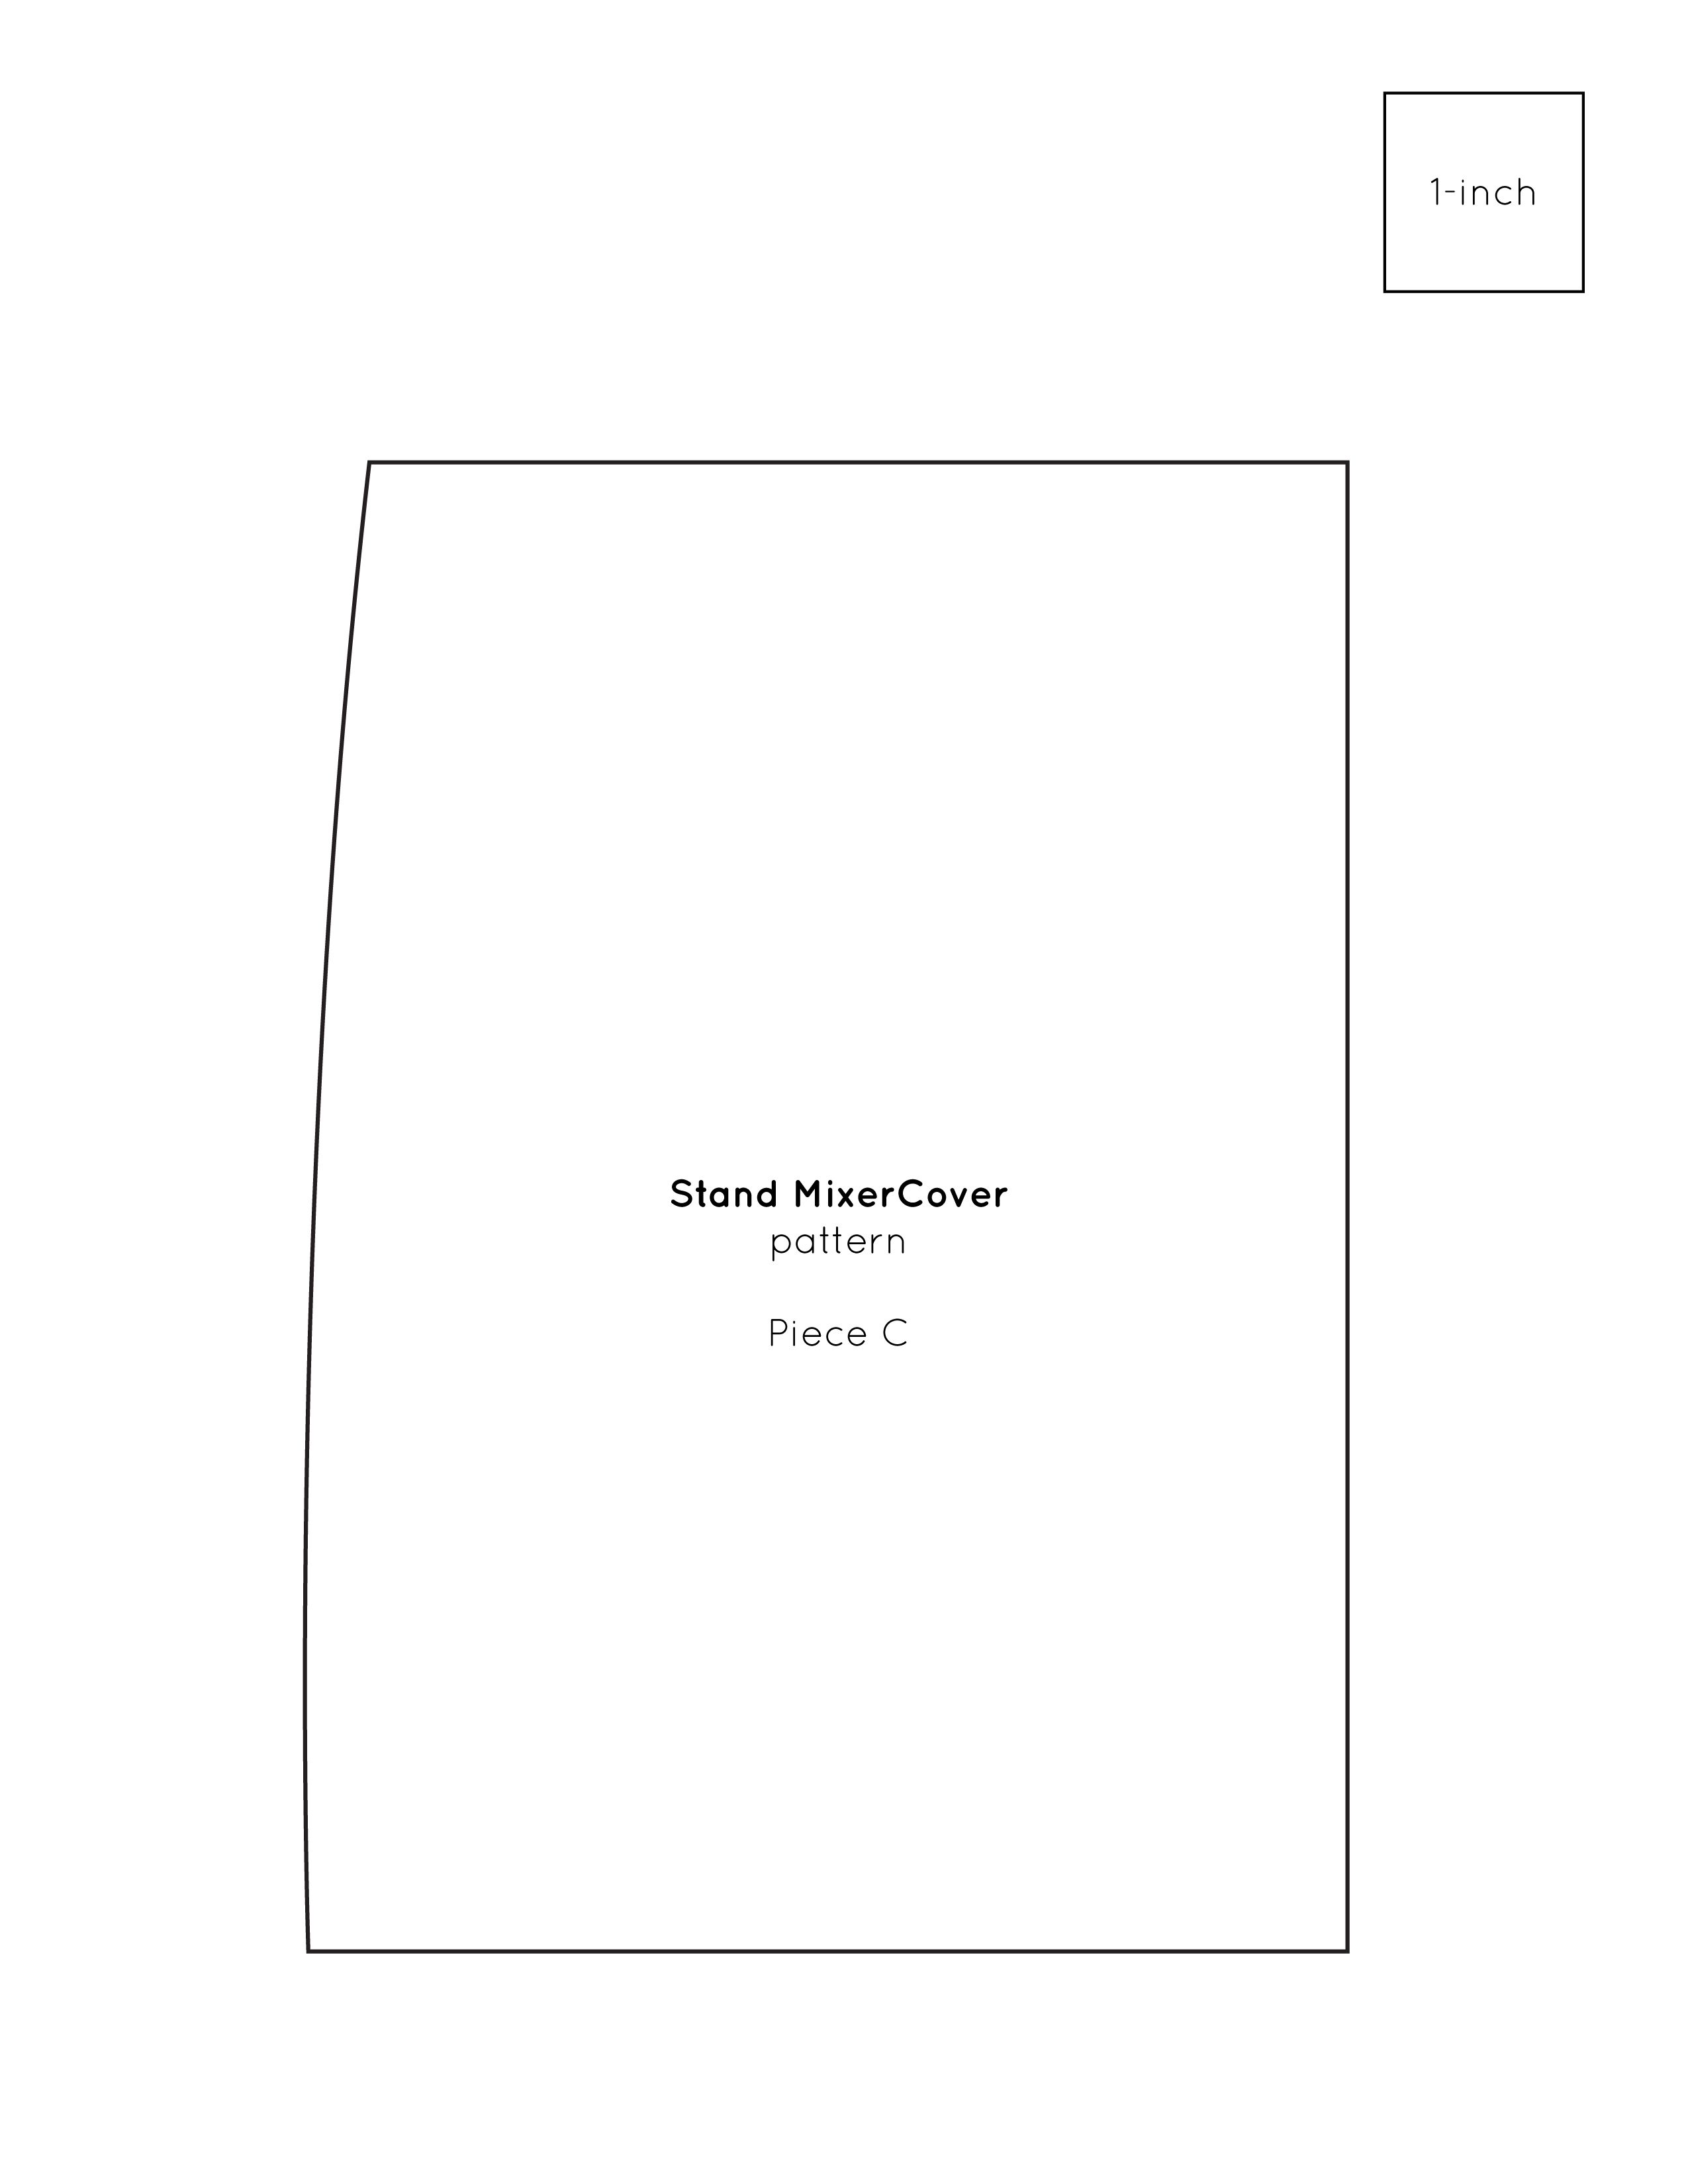
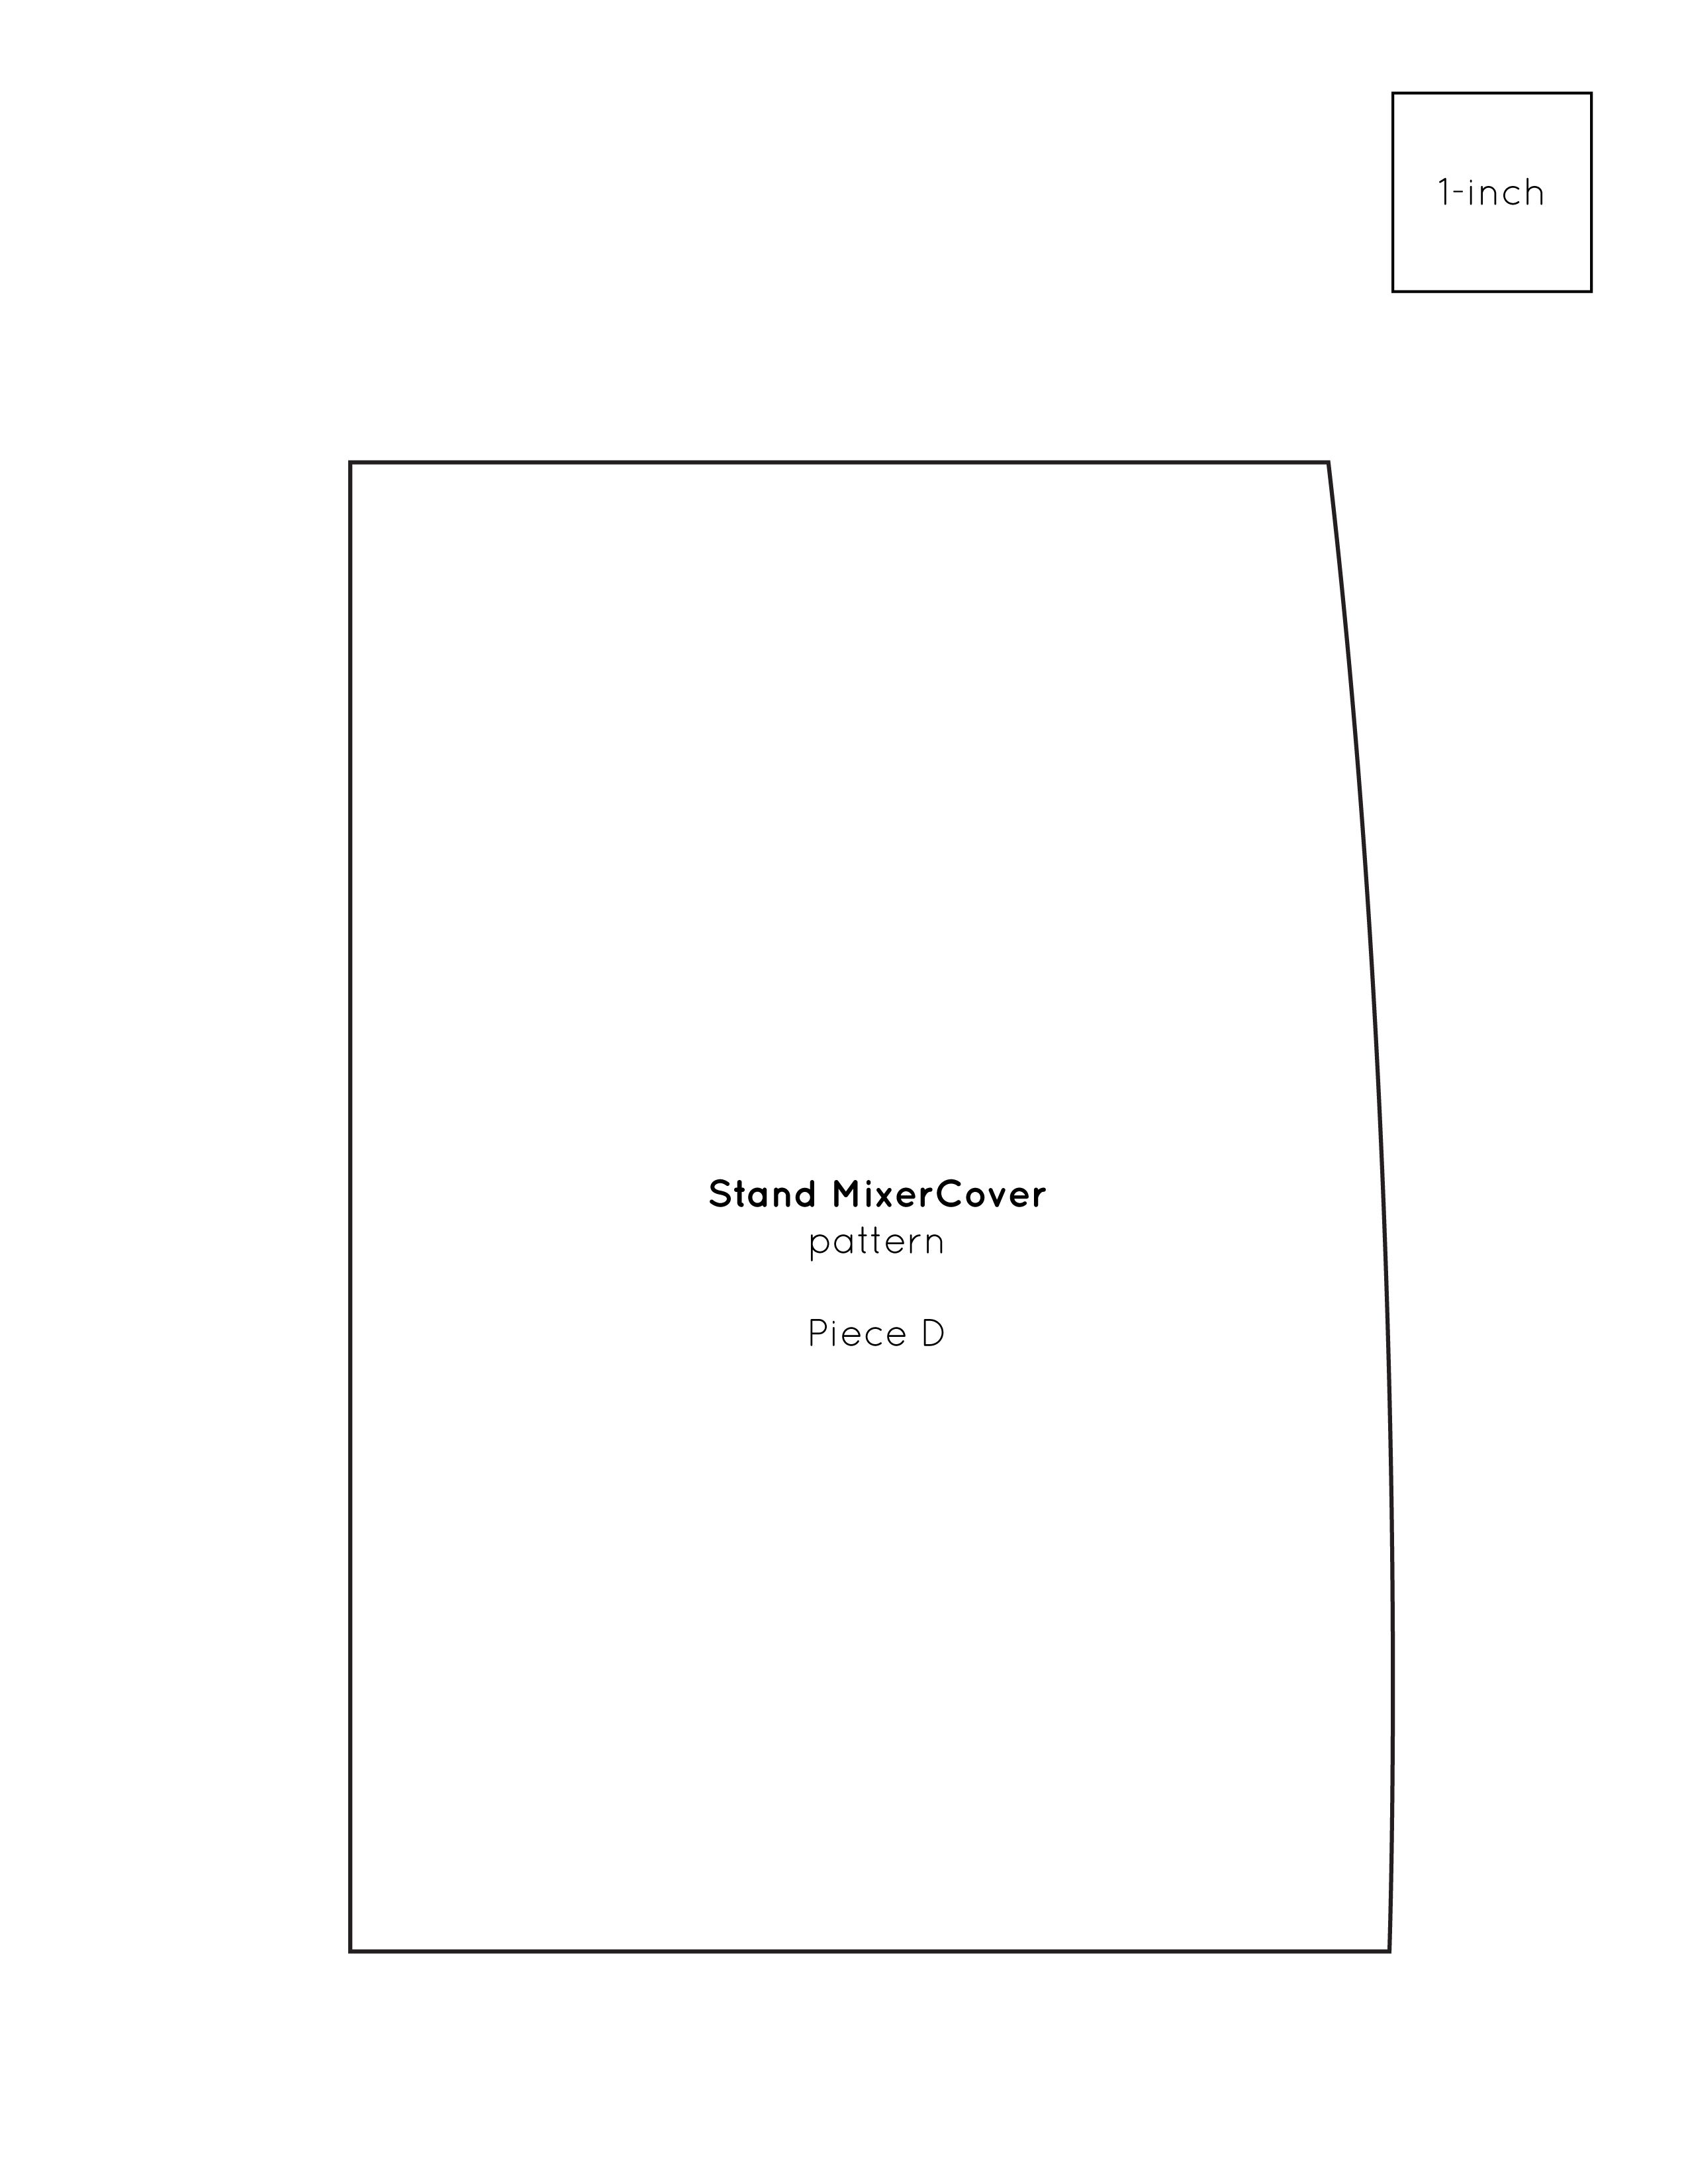
Download and Assemble the Pattern
Download and print the following pattern pieces:
Be sure to print the pieces at 100%, so the 1-inch box measures accurately. A small difference in size won't affect the cover too much, but it's best to have the pattern as close to full size as possible.
Tape the four pieces together. Set the heart template aside.
Note: All seam allowances for this project are 1/4 inch.
![stand mixer cover pattern]()
The Spruce / Mollie Johanson -
Cut the Fabric Pieces
Outside pieces:
- Cut seven 4-by-16.5-inch rectangles from your various fabrics.
- Cut two 5.5-by-16.5-inch rectangles from the main fabric.
- Cut two end pieces from the main fabric with fusible interfacing.
Inside pieces:
- Cut one 35-by-16.5-inch rectangle from the main fabric with fusible interfacing.
- Cut two end pieces from the accent fabric with fusible interfacing.
![cut stand mixer cover pieces]()
The Spruce / Mollie Johanson -
Prepare the Appliqué Hearts
Trace 10 hearts on the paper side of the fusible web. Iron the webbing to the wrong side of your chosen fabric.
Cut out all the hearts, and remove the paper backing.
![preparing heart pieces]()
The Spruce / Mollie Johanson -
Attach the Heart Appliqué Pieces
Fold one of the 5.5-by-16.5-inch rectangles in half, and make a small crease to mark the middle. Place the first heart on the center crease 1 inch from the top. Evenly space a total of five hearts, so they are also 1 inch from the top.
Iron the hearts in place. Repeat with the other 5.5-by-16.5-inch rectangle and the five remaining hearts. Then, sew around each heart about 1/8 inch from the raw edge.
![ironing hearts]()
The Spruce / Mollie Johanson -
Sew the Outside Patchwork
Pin and sew all the outside rectangles together, forming the patchwork side panels. The two pieces with the hearts should be at each end, with the points of the hearts facing out.
Press the seams open.
![sewing patchwork pieces]()
The Spruce / Mollie Johanson -
Sew the Ends to the Sides
Pin the outside ends to the patchwork sides with the wrong sides together. Fold the ends and the sides to find the top center, matching the centers and starting the pinning here.
Continue pinning down the sides. Repeat for the other end, and then repeat with the lining pieces.
The sides most likely will come out longer than the ends. This is to account for small differences in seam allowances and pattern scaling. Sew around the ends on both the outside and the lining. Then, use a rotary cutter to trim any excess fabric from the sides.
![pinning ends to sides]()
The Spruce / Mollie Johanson -
Sew the Outside and Lining Together
Nest the lining in the outside piece with right sides together. Pin around the bottom edge.
Sew around the bottom, leaving a 4-inch opening on one of the end panels. Backstitch at the beginning and end.
![pinning outside and lining]()
The Spruce / Mollie Johanson -
Finish the Stand Mixer Cover
Turn the stand mixer cover right side out. Press in the seam allowance of the opening.
Then, top stitch around the bottom edge about 1/8 inch from the seam.
Iron the cover, and it's ready to use!
![topstitching the bottom edge of the cover]()
The Spruce / Mollie Johanson
:max_bytes(150000):strip_icc()/StandMixerCover3-5a6ccf82eb97de0037be1513.jpg)
:max_bytes(150000):strip_icc()/StandMixerCover4-5a6ccfac8023b900378f8493.jpg)
:max_bytes(150000):strip_icc()/StandMixerCover5-5a6ccfbb0e23d90036253f2c.jpg)
:max_bytes(150000):strip_icc()/StandMixerCover6-5a6ccf7f3418c60036777606.jpg)
:max_bytes(150000):strip_icc()/StandMixerCover7-5a6ccfa80e23d90036253cb1.jpg)
:max_bytes(150000):strip_icc()/StandMixerCover8-5a6ccfa21f4e130037e07e32.jpg)
:max_bytes(150000):strip_icc()/StandMixerCover9-5a6ccf6fff1b78003770813f.jpg)
:max_bytes(150000):strip_icc()/StandMixerCover10-5a6ccf9cc5542e00368bd96e.jpg)
Adjusting the Pattern to Fit Other Appliances
This pattern can work to make covers for appliances of similar sizes. For instance, you can use the pattern to create a blender cover by making the side panels narrower. And if you trim the bottom to make it shorter, this pattern also can work as a sewing machine cover.
:max_bytes(150000):strip_icc()/StandMixerCover11-5a6ccf8d04d1cf0037695753.jpg)
:max_bytes(150000):strip_icc()/materials-52d8ae4e4ab44806810c5dfd2e95a2dc.jpg)
:max_bytes(150000):strip_icc()/hero-3a52b3b549b0462e95f2cb093a6ae9a2.jpg)
:max_bytes(150000):strip_icc()/slipstitch-5c742f5fc9e77c0001be522d.jpg)
:max_bytes(150000):strip_icc()/hero-5ba3f551c9e77c005042246c.jpg)
:max_bytes(150000):strip_icc()/KnittingBag1-5b92a4ddc9e77c002ca5d8a0.jpg)
:max_bytes(150000):strip_icc()/vintage-light-kitchen-background-with-jeans-napkin-1125581640-bc17acef6d154b6481201f5d5296a965.jpg)
:max_bytes(150000):strip_icc()/PocketToteBag1-5b0ed848fa6bcc00379a6266.jpg)
:max_bytes(150000):strip_icc()/DrawstringBag1-b555cf6398d440418351eb0391e08420.jpg)
:max_bytes(150000):strip_icc()/bakedpotatoebagfinished-56b70bf43df78c0b135d662d.jpg)
:max_bytes(150000):strip_icc()/Sunhat2-5abe95f33418c60037f5cc3b.jpg)
:max_bytes(150000):strip_icc()/NurseCap1-59b3349122fa3a00114ad73a.jpg)
:max_bytes(150000):strip_icc()/BBQApron1-5b032970fa6bcc00363d718b.jpg)
:max_bytes(150000):strip_icc()/FoldoverBackpack19-a518ef2e75d049f9ba5dd6773f94e7dd.jpg)
:max_bytes(150000):strip_icc()/toaster-56b70e9e3df78c0b135d7755.jpg)
:max_bytes(150000):strip_icc()/sew-a-tote-bag-with-a-recessed-zipper-2977454-hero-92492676c145414faefac22dd4788a6e.jpg)
:max_bytes(150000):strip_icc()/BookCoverWithZipperPocket13-f067f232a3be44aba07871c47731e770.jpg)